I Keep Asking Avast Not to Tell Me Again but It Keeps Popping Up
Core Shields are the principal protection components in Avast Antivirus. The Cadre Shields are: File Shield, Behavior Shield, Web Shield, and Mail Shield. All Core Shields are enabled by default to ensure maximum protection for your PC.
Some settings for the Core Shields can be adjusted co-ordinate to your preferences, such as the sensitivity level for malware detections, what happens to detected malware, and customized settings for each shield. Refer to the sections in this article to acquire how to adjust the bachelor settings for your Avast Antivirus Core Shields.
Open settings
To admission the settings screen for all Core Shields:
- Open Avast Antivirus and get to
☰Menu ▸ Settings.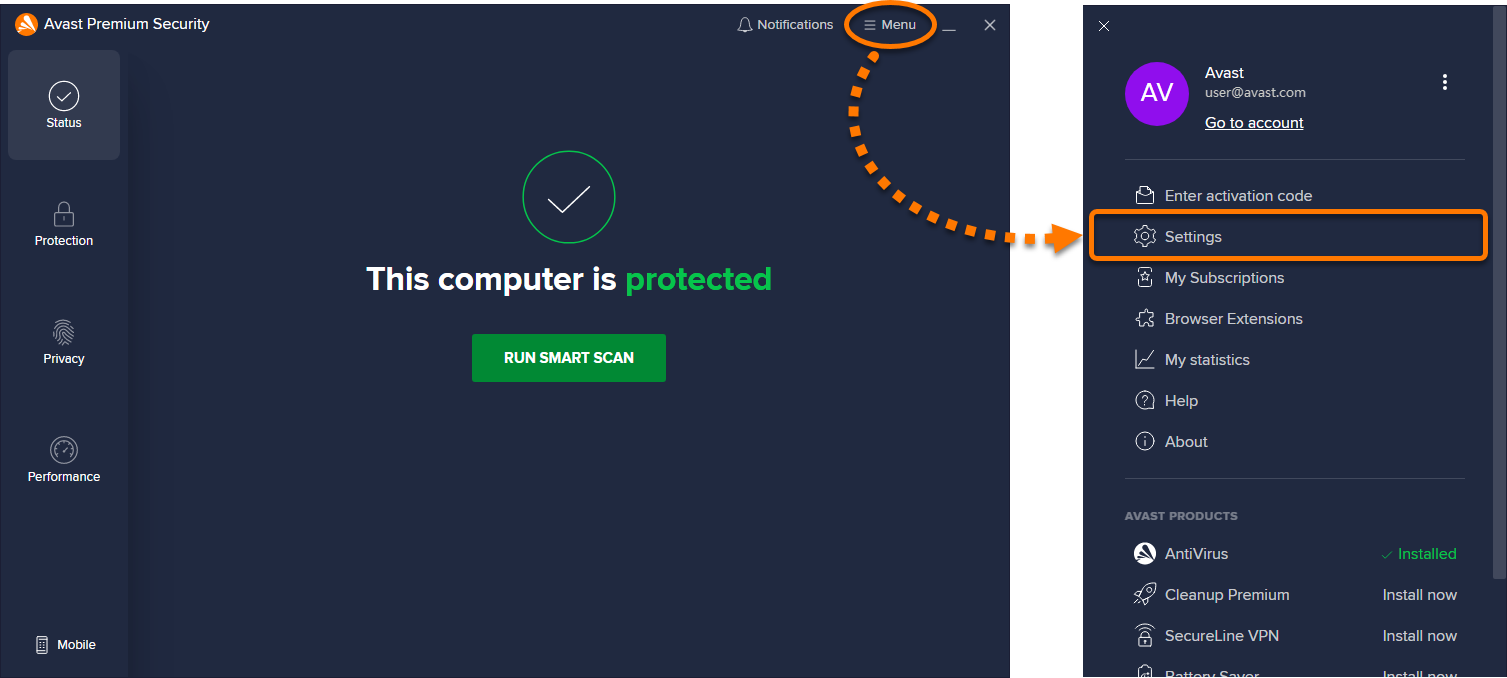
- Select Protection ▸ Core Shields.
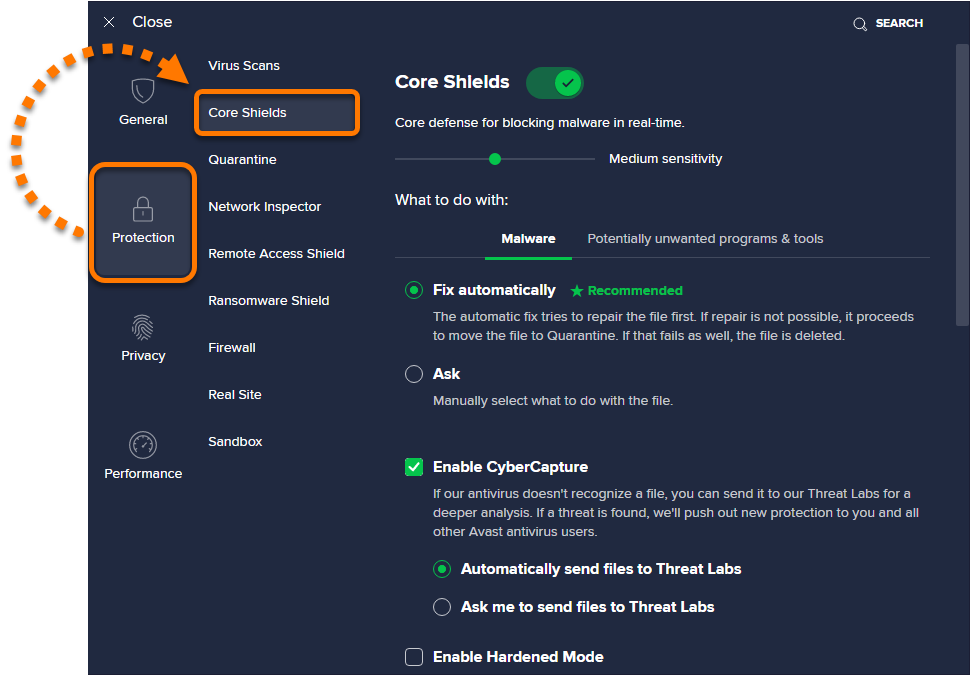
Adjust sensitivity
You tin modify the sensitivity of the Core Shields from the default Medium sensitivity.
- High sensitivity increases the protection and potential for fake positive malware detections.
- Low sensitivity reduces the chance of fake positive detections, but may besides reduce the effectiveness of the Cadre Shields.
To change the sensitivity of your Core Shields:
- Open the settings screen for all Core Shields.
- Click and hold the green marker, and so slide information technology to your desired sensitivity setting.

Configure behavior settings
Configuring behavior settings allows you to specify what you lot want the Cadre Shields to practise when they find malware and potentially unwanted programs (PUPs). There are also additional behavior settings you can adjust for increased protection.
To configure the behavior settings, open the settings screen for all Core Shields, so refer to the steps in the sections beneath:
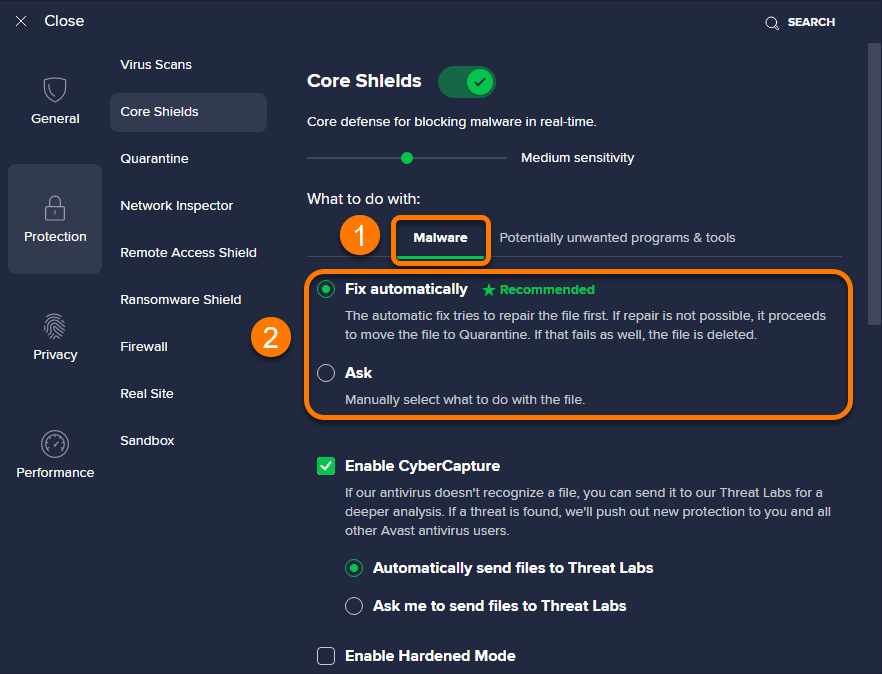
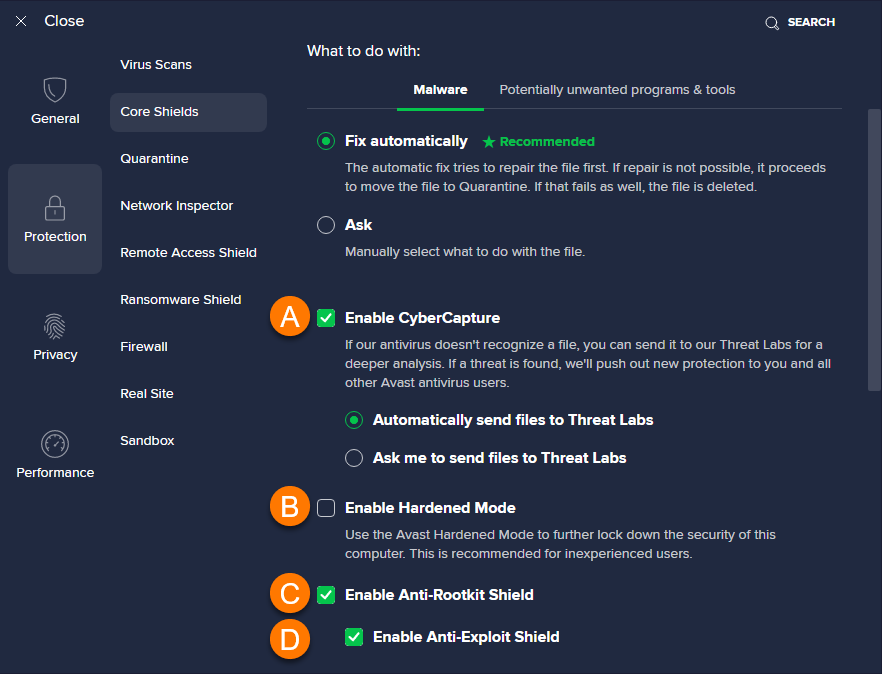
Malware
- Select the Malware tab.
- Select your preferred option:
- Fix automatically (recommended): When malware is detected, Avast Antivirus tries to repair the file. If repair is not possible, the file moves to Quarantine. If that fails, the file is deleted from your PC.
- Inquire: Avast Antivirus asks you lot to decide what to do each time malware is detected.
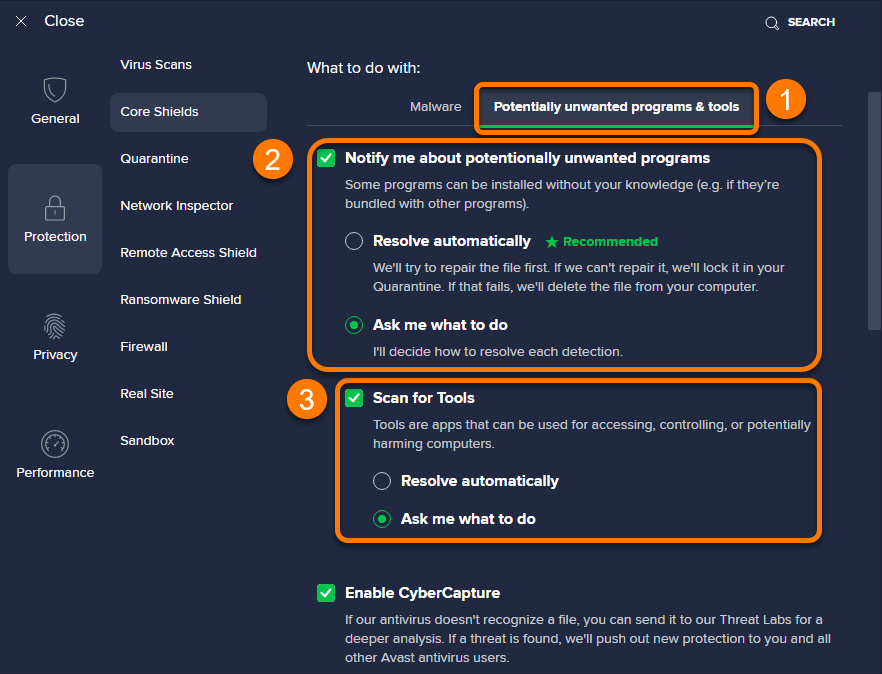
Potentially unwanted programs & tools
- Select the Potentially unwanted programs & tools tab.
- The default setting is for Avast Antivirus to notify y'all each time a potentially unwanted plan is installed on your PC. When Notify me about potentially unwanted programs is ticked, y'all can select from the following actions:
- Resolve automatically (recommended): When a potentially unwanted programme is detected, Avast Antivirus manages the plan by moving information technology to Quarantine or deleting information technology from your estimator, without any action required from you.
- Ask me what to practise: Avast Antivirus asks you to decide what to do each fourth dimension a potentially unwanted plan is detected.
- Optionally, tick the box next to Scan for Tools if y'all desire Avast Antivirus to besides observe applications that can be used for accessing, controlling, or potentially harming your computer. When ticked, you can select from the following deportment:
- Resolve automatically: Avast Antivirus manages detected applications and no action is required from y'all.
- Ask me what to do: Avast Antivirus asks y'all to decide what to do with detected applications.
Additional behavior settings
Optionally, tick (enable) or untick (disable) the following additional beliefs settings:
- Enable CyberCapture: Provides additional protection that analyzes unrecognized files. When enabled, select from the following actions:
- Automatically send files to Threat Labs: Sends all unrecognized files to Avast Threat Labs automatically.
- Ask me to send files to Threat Labs: You are prompted to make up one's mind what to do each time an unrecognized file is detected.
- Enable Hardened Style: Recommended for inexperienced figurer users who want to further secure their PC. Hardened Fashion uses information based on reputation services to decide which executable files are rubber to open.
- Enable Anti-Rootkit Shield: Monitors subconscious malicious threats in your organization. Unticking this option may resolve potential compatibility issues that tin can cause system crashes.
- Enable Anti-Exploit Shield: Detect and cake attempts to run malicious threats or processes in the system retentivity that can exploit vulnerable applications on your PC. Unticking this option may result in potential compatibility issues that can crusade system crashes.
Manage individual shield settings
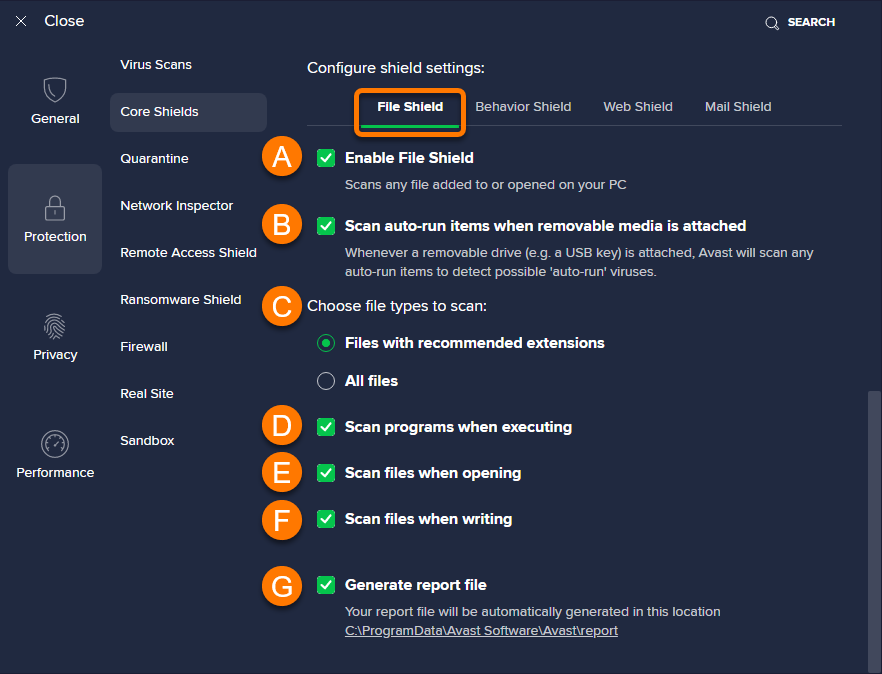
File Shield actively scans all programs and files on your difficult drive as they are opened, run, modified, and saved. If malware is detected, File Shield prevents the program or file from infecting your PC.
- Open the settings screen for all Core Shields, then scroll to Configure shield settings.
- Select the File Shield tab, then optionally tick (enable) or untick (disable) the following settings:
- Enable File Shield: Scans whatsoever file added to or opened on your PC. To temporarily disable File Shield, untick the box, then select a time duration, and click OK, Stop. File Shield automatically enables again when the specified fourth dimension duration elapses.
- Browse automobile-run items when removable media is fastened: Scans files that are programed to run automatically from removable drives (for example, a USB key) when they are connected to your PC.
- Choose file types to scan:
- Files with recommended extensions: Only scans file types recommended by Avast Antivirus.
- All files: Scans all file types.
- Scan programs when executing: Scans programs, scripts, and libraries each time they are run.
- Scan files when opening: Scans each time yous open a file.
- Scan files when writing: Scans when files are beingness created or modified.
- Generate report file: Automatically generates reports of scan results.
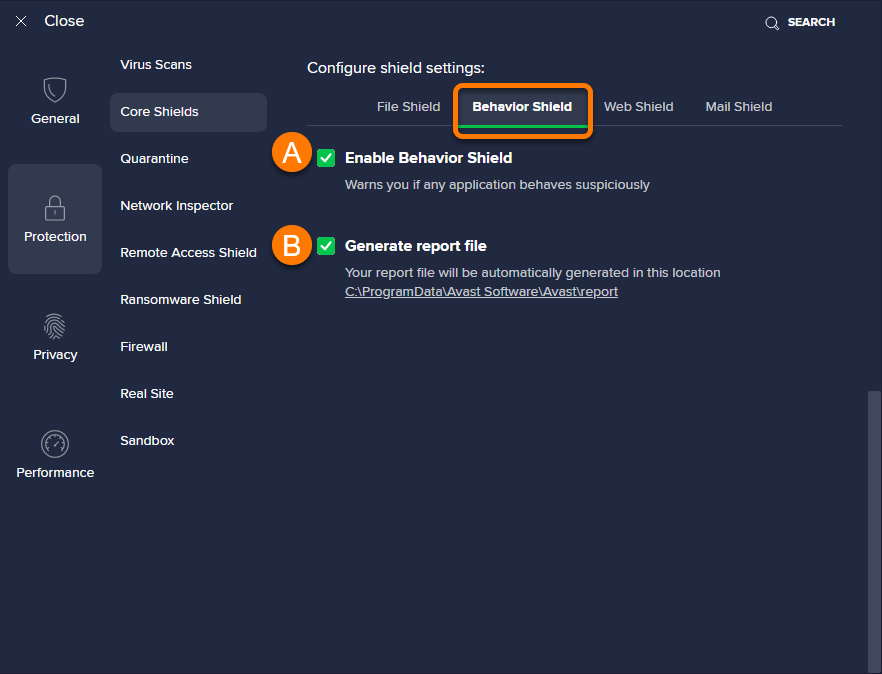
Behavior Shield monitors programs installed on your PC for suspicious behavior that may indicate the presence of malicious code.
- Open the settings screen for all Core Shields, then coil to Configure shield settings.
- Select the Behavior Shield tab, and so optionally tick (enable) or untick (disable) the post-obit settings:
- Enable Beliefs Shield: Warns you if any application behaves suspiciously. To temporarily disable Behavior Shield, untick the box, then select a time duration, and click OK, Terminate. Behavior Shield automatically enables again when the specified time duration elapses.
- Generate written report file: Automatically generates reports of scan results.
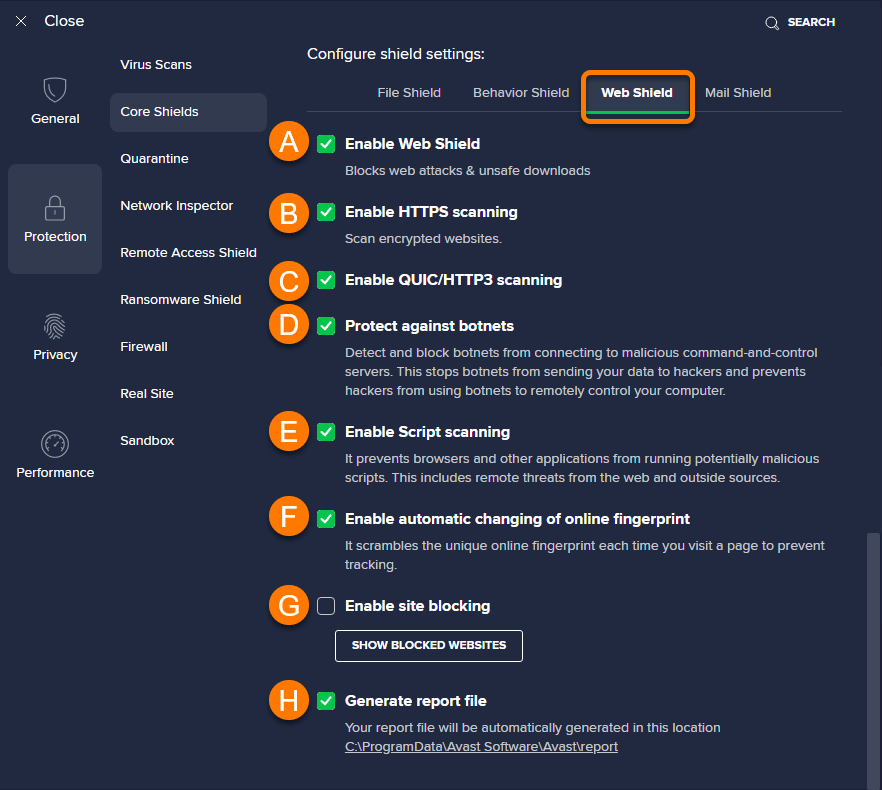
Web Shield actively scans information that is transferred when yous scan the internet to prevent malware from being downloaded and run on your PC.
- Open up the settings screen for all Core Shields, then scroll to Configure shield settings.
- Select the Web Shield tab, then optionally tick (enable) or untick (disable) the following settings:
- Enable Web Shield: Blocks web attacks & unsafe downloads. To temporarily disable Web Shield, untick the box, then select a time duration, and click OK, Stop. Web Shield automatically enables again when the specified fourth dimension duration elapses.
- Enable HTTPS scanning: Includes scanning of encrypted websites.
- Enable QUIC/HTTP3 scanning: Scans communications sent and received via Google's QUIC protocol.
- Protect against botnets: Prevents botnets from using your computer to attack other computers.
- Enable Script scanning: Prevents browsers and other applications from running potentially malicious scripts. This includes remote threats from the web and outside sources.
- Enable automatic changing of online fingerprint: Prevents websites from tracking your activity by scrambling your online fingerprint each time you visit a web folio.
- Enable site blocking: Allows you to block access to specific websites. To block admission to a website from your PC, click Show blocked websites ▸ Add together website, then enter the website address. Click Shut to confirm the addition and return to Web Shield settings.
- Generate study file: Automatically generates reports of scan results.
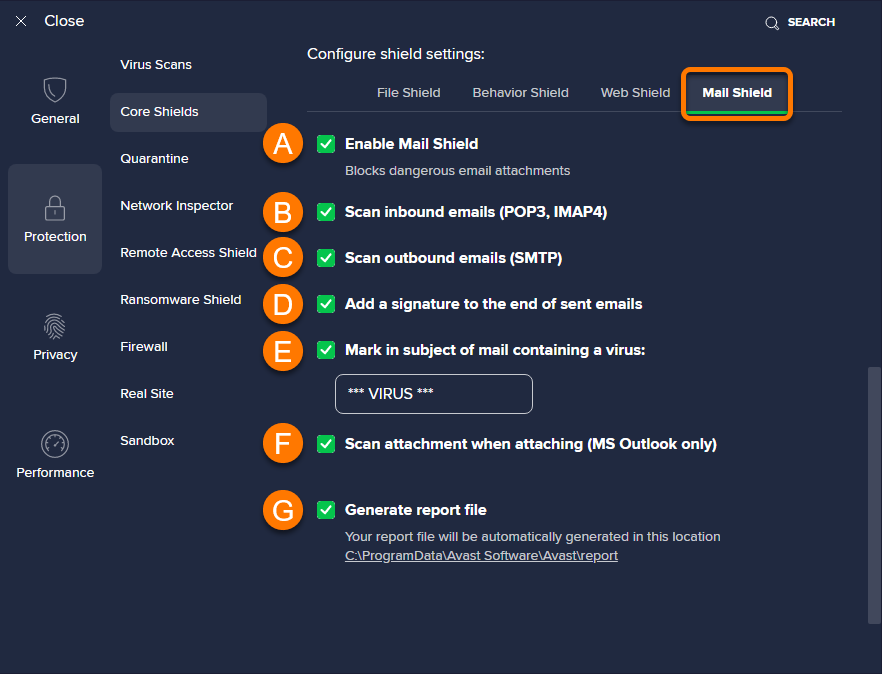
Mail Shield scans for threats in your incoming and outgoing e-mail messages. Scanning applies only to messages sent or received using post direction software, such as Microsoft Outlook or Mozilla Thunderbird.
- Open up the settings screen for all Cadre Shields, so scroll to Configure shield settings.
- Select the Mail Shield tab, then optionally tick (enable) or untick (disable) the post-obit settings:
- Enable Mail Shield: Blocks unsafe email attachments. To temporarily disable Mail Shield, untick the box, then select a fourth dimension duration, and click OK, Stop. Post Shield automatically enables over again when the specified time duration elapses.
- Browse inbound emails (POP3, IMAP4): Scans all incoming emails sent using an SSL/TLS encrypted connection.
- Browse outbound emails (SMTP): Scans all outbound emails sent using an SSL/TLS encrypted connexion.
- Add a signature to the finish of sent emails: Includes a message for the recipient in an outgoing e-mail confirming that the email has been scanned for malware and is clean.
- Marking in subject area of mail containing a virus: Specify a specific discussion or phrase in the text box that will automatically be added to the subject area of any e-mail containing a virus.
- Scan attachment when attaching (MS Outlook merely): Scan approachable email attachments sent with Microsoft Outlook.
- Generate report file: Automatically generates reports of scan results.
Disable all Cadre Shields
All Core Shields are enabled by default. To ensure your security, we recommend keeping all Core Shields enabled and only disabling them for temporary troubleshooting purposes. To temporarily disable individual shields, refer to the relevant tab in the Manage individual shield settings department above.
To temporarily disable all Core Shields:
- Open the settings screen for all Cadre Shields.
- Click the green (ON) slider, so select a fourth dimension duration to disable all Cadre Shields.
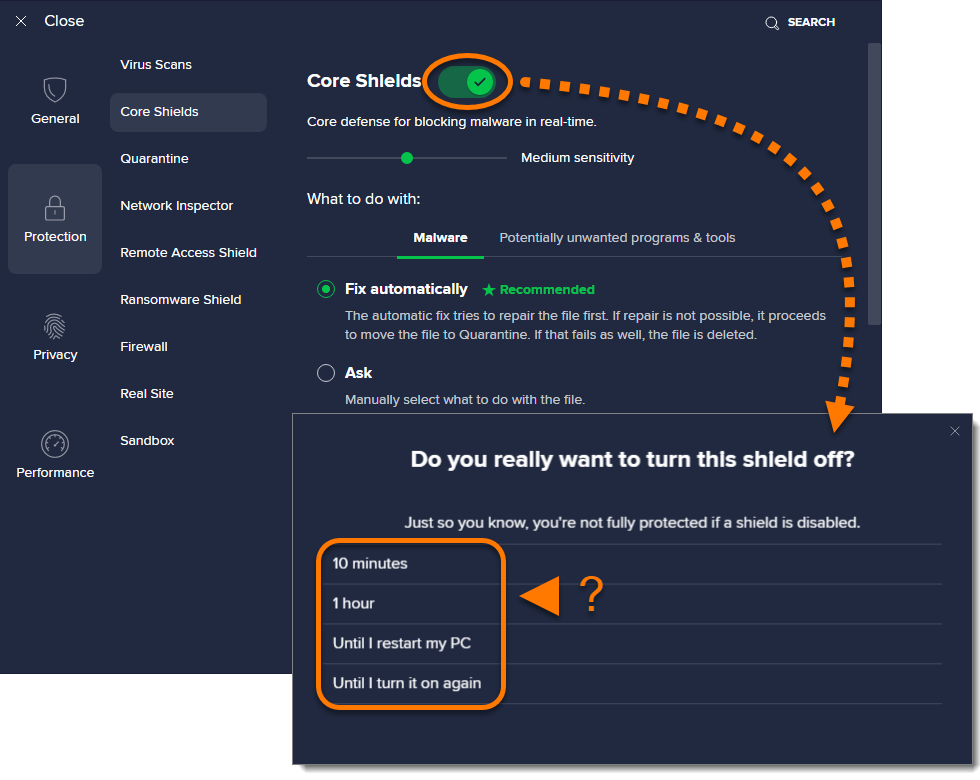
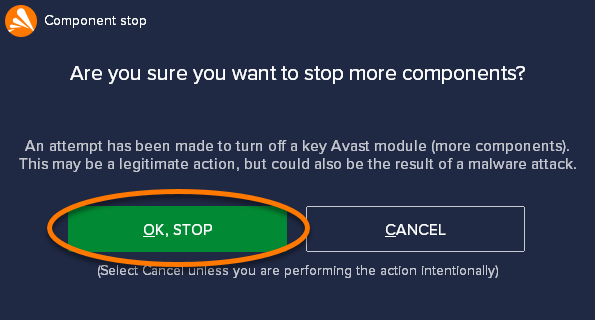
- Click OK, End.
All Core Shields are at present temporarily disabled. The Core Shields automatically enable over again when the specified time duration elapses. To manually enable all Core Shields, click the ruby-red (OFF) slider and then that it changes to light-green (ON).
Further recommendations
For information about avant-garde settings for each of the Core Shields, refer to the following article:
- Using the Avast Geek settings area in Avast Antivirus
- Avast Premium Security 22.x for Windows
- Avast Complimentary Antivirus 22.x for Windows
- Microsoft Windows 11 Home / Pro / Enterprise / Education
- Microsoft Windows ten Home / Pro / Enterprise / Education - 32 / 64-flake
- Microsoft Windows viii.one / Pro / Enterprise - 32 / 64-chip
- Microsoft Windows 8 / Pro / Enterprise - 32 / 64-bit
- Microsoft Windows 7 Home Basic / Home Premium / Professional / Enterprise / Ultimate - Service Pack 1 with Convenient Rollup Update, 32 / 64-bit
Source: https://support.avast.com/en-id/article/Antivirus-shield-settings/
0 Response to "I Keep Asking Avast Not to Tell Me Again but It Keeps Popping Up"
Post a Comment